Getting Started with Obelisk
This guide walks you through running a durable application with Obelisk, a workflow runtime that
automatically recovers your program from crashes. You'll write a step activity, serial and
parallel workflows, and a webhook endpoint in JavaScript, then see crash recovery in action.
No build step or toolchain required — just install Obelisk and run.
1. Install Obelisk
curl -L --tlsv1.2 -sSf https://raw.githubusercontent.com/obeli-sk/obelisk/main/download.sh | bashSee the Installation page for Docker, Nix, prebuilt binaries, and other options.
2. Clone the Tutorial
git clone https://github.com/obeli-sk/demo-tutorial.git
cd demo-tutorial
The repository contains four JavaScript files, an app.toml naming the app, and a
deployment.toml. There is nothing else to install or compile.
Starting from an empty project instead? Generate a runnable starter app:
obelisk generate new my-app
cd my-app
It contains app.toml, deployment.toml, and a JavaScript webhook, workflow, and HTTP activity.
The rest of this guide explains the same pieces using the tutorial repository.
3. The Components
Activity
activity/step.js — the unit of side-effectful work. Activities are retried automatically on
timeout or failure.
// tutorial:demo/activity.step: func(idx: u32, sleep-millis: u32) -> result<u32>
export default async function step(idx, sleep_millis) {
  console.log(`Step ${idx} started`); // logs are persisted
  await new Promise((r) => setTimeout(r, sleep_millis));
  console.log(`Step ${idx} completed`);
  return idx;
}
Workflows
Workflows orchestrate activities. They must be deterministic — given the same inputs and event history they always produce the same sequence of calls. This lets Obelisk recover them from crashes by replaying the execution log.
workflow/serial.js — runs 10 steps in sequence with a persistent 1-second sleep between each:
// tutorial:demo/workflow.serial: func() -> result<u32, string>
import { step } from "tutorial:demo/activity";
import * as obelisk from "obelisk:workflow@1.0.0";

export default function serial() {
  let acc = 0;
  for (let i = 0; i < 10; i++) {
    obelisk.sleep({ seconds: 1 });
    const result = step(i, i * 200);
    acc += result;
    console.log(`step(${i})=${result}`);
  }
  console.log(`serial completed: ${acc}`);
  return acc;
}
Key concepts:
- ES module imports —
import { step } from "tutorial:demo/activity"imports the activity by its interface name. Obelisk resolves the import at startup: callingstep(...)submits the activity, blocks until it completes, and returns the ok payload. The call and its result are recorded in the execution log, so on replay the activity is not re-executed. Function names are converted from kebab-case to camelCase automatically. obelisk.sleepis a persistent sleep — its position is saved to the execution log. If the server crashes mid-sleep and restarts, the sleep resumes where it left off.
workflow/parallel.js — submits all 10 steps concurrently using
join sets, then awaits results:
// tutorial:demo/workflow.parallel: func() -> result<u32, string>
import { stepSubmit, stepAwaitNext } from "tutorial:demo-obelisk-ext/activity";
import * as obelisk from "obelisk:workflow@1.0.0";

export default function parallel() {
  const handles = [];
  for (let i = 0; i < 10; i++) {
    const js = obelisk.createJoinSet();
    stepSubmit(js, i, i * 200);
    handles.push({ i, js });
  }
  console.log("parallel: submitted all child executions");
  let acc = 0;
  for (const { i, js } of handles) {
    const result = stepAwaitNext(js);
    acc = 10 * acc + result;
    console.log(`step(${i})=${result}, acc=${acc}`);
    obelisk.sleep({ milliseconds: 300 });
  }
  console.log(`parallel completed: ${acc}`);
  return acc;
}
Webhook Endpoint
webhook/tutorial.js — serves HTTP and triggers workflows via imports:
import { serial } from "tutorial:demo/workflow";
import { parallel } from "tutorial:demo/workflow";

export default function handle(request) {
  const url = new URL(request.url);
  const path = url.pathname;
  console.log(`Handling request: ${path}`);

  if (path === "/serial") {
    const result = serial();
    return new Response(`serial workflow completed: ${result}`, { status: 200 });
  } else if (path === "/parallel") {
    const result = parallel();
    return new Response(`parallel workflow completed: ${result}`, { status: 200 });
  } else {
    return new Response("not found\ntry /serial or /parallel", { status: 404 });
  }
}
Configuration
deployment.toml wires the components together. Each entry assigns an
FFQN (package:namespace/interface.function) and
WIT types to the JS function — Obelisk
synthesizes the interface at startup, so no WIT files are needed. The FFQN is the address used in ES
module imports and dynamic.call from obelisk:workflow-dynamic@1.0.0; the JS function name maps
to the function part of it. See JS components
for links to the per-type pages (activities, workflows, webhooks) and JSON encoding.
Prefer imports when the target function is known statically. Imports are verified when the deployment starts; use dynamic FFQN calls only when the target is constructed at runtime.
[[activity_js]]
name = "step"
location = "activity/step.js"
ffqn = "tutorial:demo/activity.step"
params = [
  { name = "idx", type = "u32" },
  { name = "sleep-millis", type = "u32" },
]
return_type = "result<u32>"
exec.lock_expiry.seconds = 10

[[workflow_js]]
name = "serial"
location = "workflow/serial.js"
ffqn = "tutorial:demo/workflow.serial"
params = []
return_type = "result<u32, string>"

[[workflow_js]]
name = "parallel"
location = "workflow/parallel.js"
ffqn = "tutorial:demo/workflow.parallel"
params = []
return_type = "result<u32, string>"

[[webhook_endpoint_js]]
name = "webhook"
location = "webhook/tutorial.js"
routes = ["/*"]
See Deployment Configuration for all options.
4. Run
obelisk server run --app-config app.toml --deployment deployment.tomlThree endpoints start automatically:
- Web UI at http://localhost:8080
- Webhook server at http://localhost:9090
- API at http://localhost:5005
Trigger the serial workflow:
curl http://localhost:9090/serialAfter ~20 seconds (10 steps × 1 s sleep each):
serial workflow completed: 45Trigger the parallel workflow — all steps run concurrently, finishes in a few seconds:
curl http://localhost:9090/parallelparallel workflow completed: 1234567895. Inspect Executions
The API port (5005) requires a bearer token. On startup Obelisk prints an ephemeral token to the
console; export it so the curl examples below can authenticate (the webhook port 9090 above
needs no token):
export OBELISK_API_TOKEN=<token printed on server startup>For a throwaway tutorial you can instead start the server with --no-auth and drop the
Authorization header. See Authentication.
List top-level executions — one per webhook call:
curl -s "http://localhost:5005/v1/executions" -H 'Accept: text/plain' \
  -H "Authorization: Bearer $OBELISK_API_TOKEN"
E_01KN209P2PC... Finished(ok) wasi:http/incoming-handler.handle 2026-03-31 13:11:01 UTCFetch logs for a webhook execution (includes its console.log output):
EXECUTION_ID=E_01KN209P2PC...
curl -s "http://localhost:5005/v1/executions/${EXECUTION_ID}/logs" -H 'Accept: text/plain' \
  -H "Authorization: Bearer $OBELISK_API_TOKEN"
To see the child workflow and activities spawned by a webhook, use show_derived and filter by FFQN
prefix:
curl -s "http://localhost:5005/v1/executions?show_derived=true&ffqn_prefix=tutorial:demo" \
  -H 'Accept: text/plain' -H "Authorization: Bearer $OBELISK_API_TOKEN"
E_01KN209P2PC....o:1_1 Finished(ok) tutorial:demo/workflow.serial 2026-03-31 13:11:01 UTC
E_01KN209P2PC....o:1_1.o:2-step_1 Finished(ok) tutorial:demo/activity.step 2026-03-31 13:11:02 UTC
...Then fetch logs for the workflow execution by its ID — console.log calls appear as structured log
entries with timestamps.
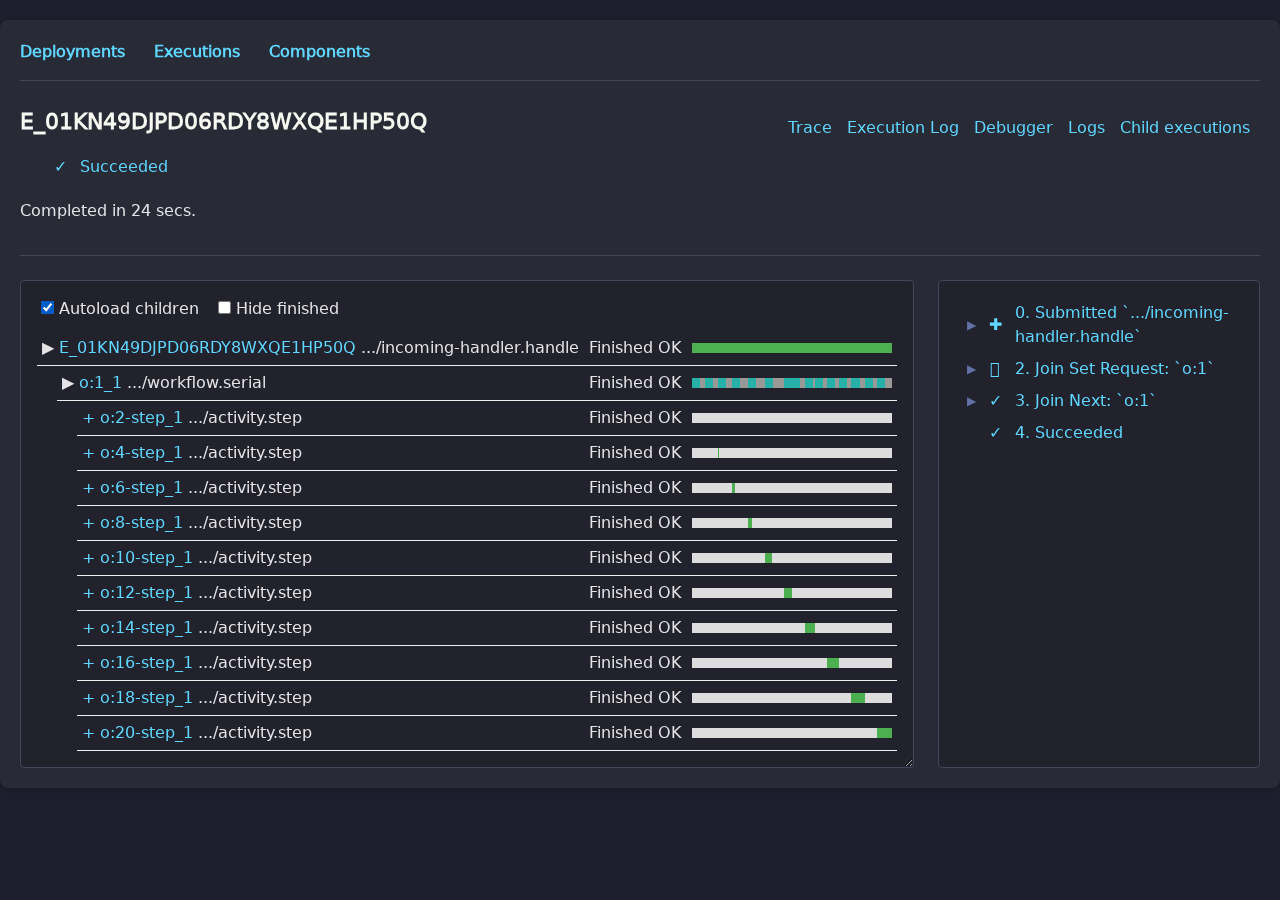
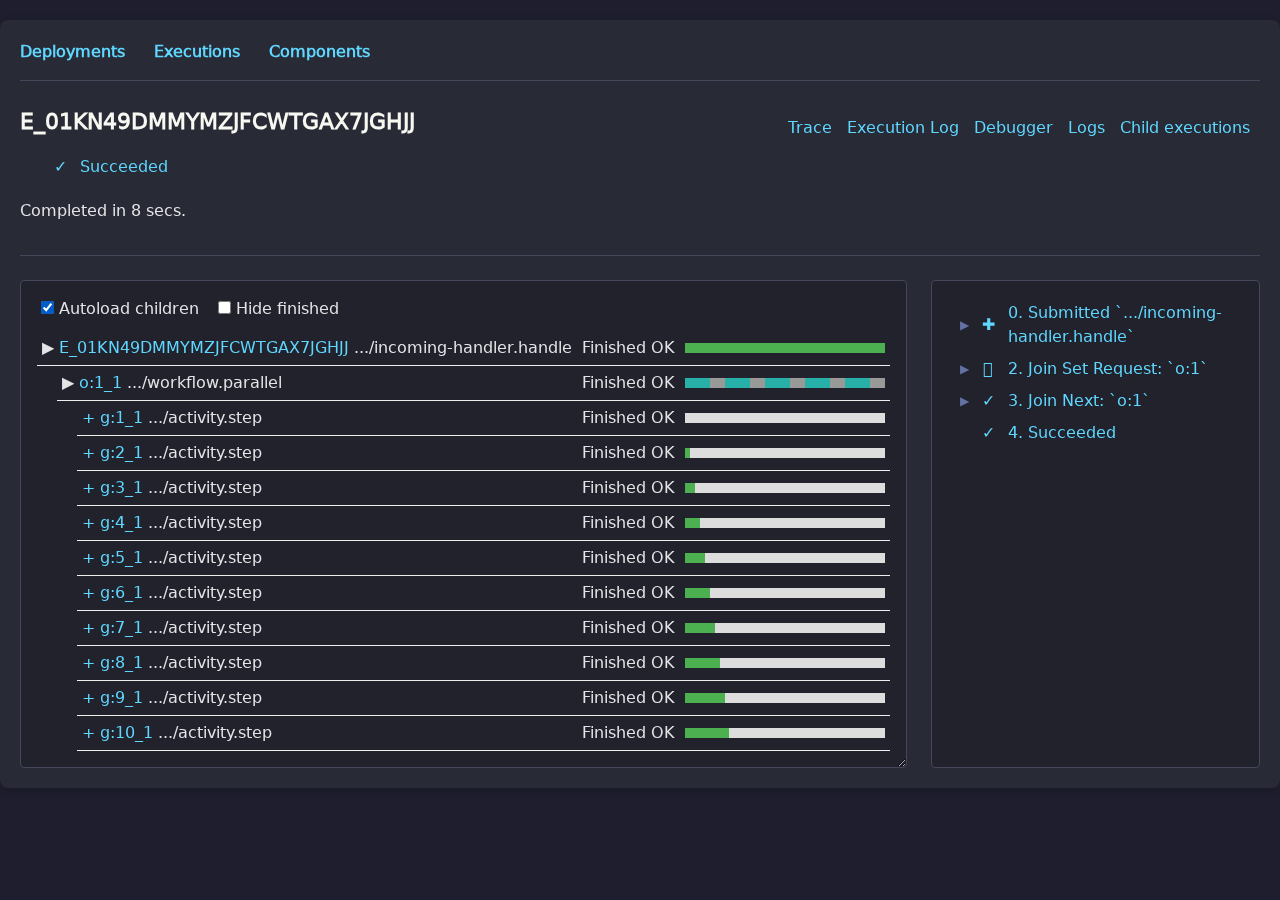
The Web UI at http://localhost:8080 provides a visual trace. Click an execution and enable Autoload children to see the full hierarchy of webhook → workflow → activities.
Serial workflow — steps run one at a time:
Parallel workflow — all steps run concurrently:
6. Crash Recovery
Start the serial workflow, then kill the server while it is running:
# terminal 1
curl http://localhost:9090/serial

# terminal 2 — kill mid-execution
kill $(pgrep obelisk)
The curl request fails — but the workflow state is safely persisted. Restart the server:
obelisk server run --app-config app.tomlNo --deployment flag needed: Obelisk persists the full deployment configuration — including the
paths to JS source files — in the database on first run, so the server can reload all components on
restart without re-specifying them. Obelisk resumes the workflow from its last completed step.
Already-completed activities are not re-executed.
This is durable execution: your workflows survive server crashes, restarts, and deployments without losing progress or duplicating work.
Next Steps
-
Go further: Saga Pattern with Fly.io — learn the saga pattern by creating a fly.io app, running a short-lived AI agent VM, and guaranteeing cleanup via a two-level workflow. Introduces pre-built WASM activities and crash-safe compensation.
-
Understand the concepts: JS Activities, JS Workflows, JS Webhooks, Join Sets
-
WASM/Rust alternative: Getting Started (Rust / WASM) — same tutorial implemented in Rust compiled to WebAssembly.
-
Build your own Rust project: See Rust components for the WIT world,
bindgen!, and Cargo setup.The
rust/directory in the demo-tutorial contains a Rust implementation of the same activity, workflow, and webhook. -
Explore example apps: Example applications introduces the agent template, browser automation demo, tutorial, and other apps.
-
Learn the CLI: CLI reference covers submitting executions, inspecting state, and managing components.
-
Read the blog: Comparing Obelisk with DBOS walks through this same tutorial code in depth, comparing the approach with DBOS Java.